How to create multiplayer virtual reality applications in Unreal Engine
- 01 Nov 2024Setup
- CPU: Intel Core i5-13600KF
- GPU: Inno3D GeForce RTX 4070 TWIN X2
- RAM: 64 GB
- OS: Windows 10 Pro 22H2
- UE: 5.4
Summary
This tutorial explains how to extend the Unreal Engine’s Virtual Reality (VR) template to support multiplayer. Since this tutorial assumes familiarity with the VR template, I will not explain its internal workings beyond what is necessary to understand the changes being made. By the end of this tutorial, you will have the fundamentals to start developing free-roam and multiplayer free-room VR content. If you have any questions, feel free to email us.
Project setup
To start, launch the Unreal Engine, go to Games, and select Virtual Reality. Leave the default settings enabled, select the project location, and give it an appropriate name (e.g. MultiplayerVR). Next, click create.
When developing a multiplayer game with Unreal, there are two types of servers that can be used. And yes, I am going to shamelessly quote the Unreal official documentation:
- Dedicated server: “A dedicated server consists of a server that runs headlessly. This means that there are no clients playing directly in the dedicated server game instance. Every player comes from a connected, remote client. A headless server does not render any visuals and nobody is playing locally on the headless server.”
- Listen server: “A listen server consists of a client hosting the game on their machine and acting as the server. Other clients connect to the hosting client and play the game on the hosting client’s instance. In this model, the hosting client is the authoritative host. This gives them an advantage over the connected clients as they are actively playing in the true game state.”
In this tutorial, we will only use the listen server approach. The reason for this is two-fold. First, I started extending the VR template to multiplayer because I am interested in developing LBVR games. In this context, a listen server makes more sense because an admin panel can be created based on a player who is not participating in the gameplay. Also, an LBVR game is most likely to be hosted on a LAN network, and therefore, the advantage of the player hosting the game will be less troublesome since the latency is much lower than in an MMORPG. Secondly, to set up a dedicated server, you need to build Unreal Engine from source, as this is not possible with a binary installation.
VRPawn
Teleport
The teleport feature allows a player to move across the VR template’s level using the right thumbstick on the controller. For the sake of explanation, let’s assume we have a listen server with three players:
- Player 1: a client connected to the server.
- Player 2: a client connected to the server.
- Player 3: a client connected to the server and hosting the game (i.e., the server).
Let’s say that player 1 is teleporting. The new location is only visible on player 1’s game instance. In other words, players 2 and 3 don’t see player 1 move. Why is this, you may ask? Well, each player hosts their own version of the game called a game instance. When player 1 doesn’t inform the server that they have moved, the game instances of players 2 and 3 are not updated by the server. Therefore, we need to tell the server that we have moved. Better yet, we will tell the server that we want to move and let the server move a copy of our pawn, hosted on the server. Then the server tells players 2 and 3 to move their local copy of player 1. This is a very brief explanation of what is happening and why a player’s movement is not seen by the other players by default. To make this movement visible, we need to replicate the movement. A more in-depth explanation of networking in Unreal Engine can be found on their Networking Overview page.
Now you may ask yourself: “How do I tell the server to move the player?” Great question! Let’s head over to the VRPawn Blueprint and discover this together. Open the Content Drawer, then navigate to VRTemplate > Blueprints > VRPawn. In the event graph, look for the Input Action Move - Teleport. This section contains the logic to teleport the VR pawn across our level.
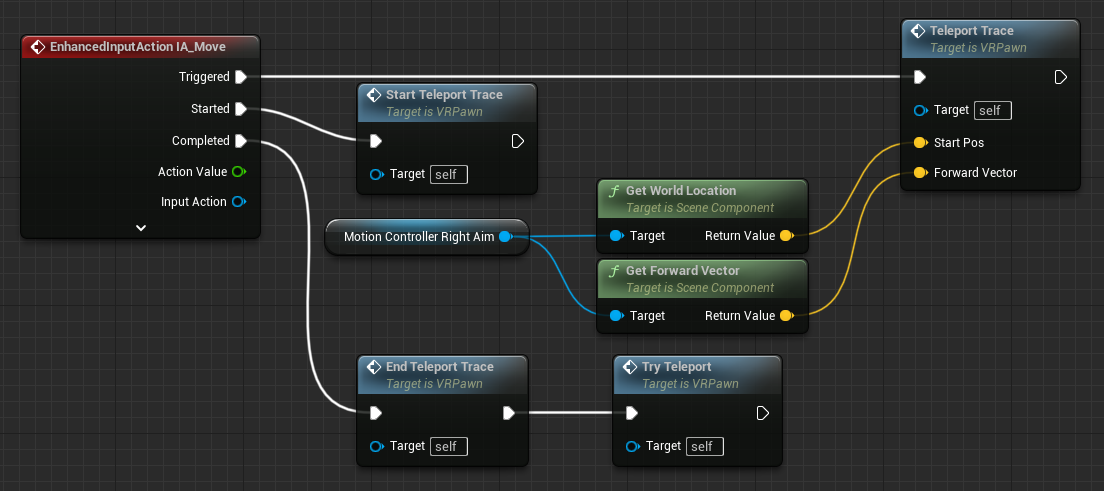
Now, it is important to figure out which part should be executed on the server. The functions StartTeleportTrace, TeleportTrace, and EndTeleportTrace are used to visualize where the player is going to be teleported. This is something that the other players don’t necessarily have to see. However, the actual teleportation is performed by the TryTeleport function, and this is exactly what we want to execute on the server. But how do we do this? Well, Unreal has something called Remote Procedure Calls (RPCs), which are defined as functions called locally that execute remotely on one or more connected machines. RPCs help clients and the server call functions on one another over a network connection. RPCs are unidirectional function calls; as such, they cannot specify a return value.
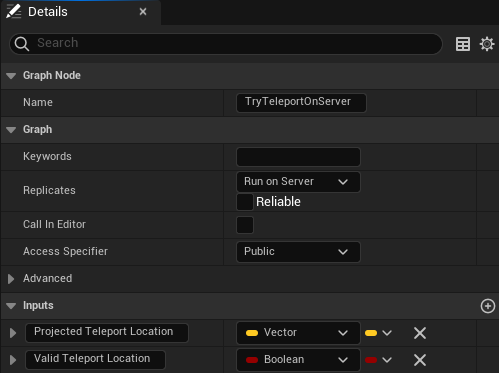
To define such an RPC, right-click in the Event Graph and search for Add Custom Event. When we create a custom event, a details panel appears on the right side. In this panel, we can name the event. In our case, let’s name it TryTeleportOnServer. What we have done now is create a custom event that we can call from our code. However, if we call this event, it will still be executed on the client. To execute it on the server, we need to select the option Run on Server from the Replicates drop-down menu.
Next, we need to define two inputs. The first input is a vector, which we will call Projected Teleport Location. The second input is a boolean, which we will call Valid Teleport Location. Both variables are used by the TryTeleport function, which will be executed on the server but set by the TeleportTrace function, which will be executed on the client. Therefore, these variables need to be transferred to the server. The settings for the TryTeleportOnServer event are now:
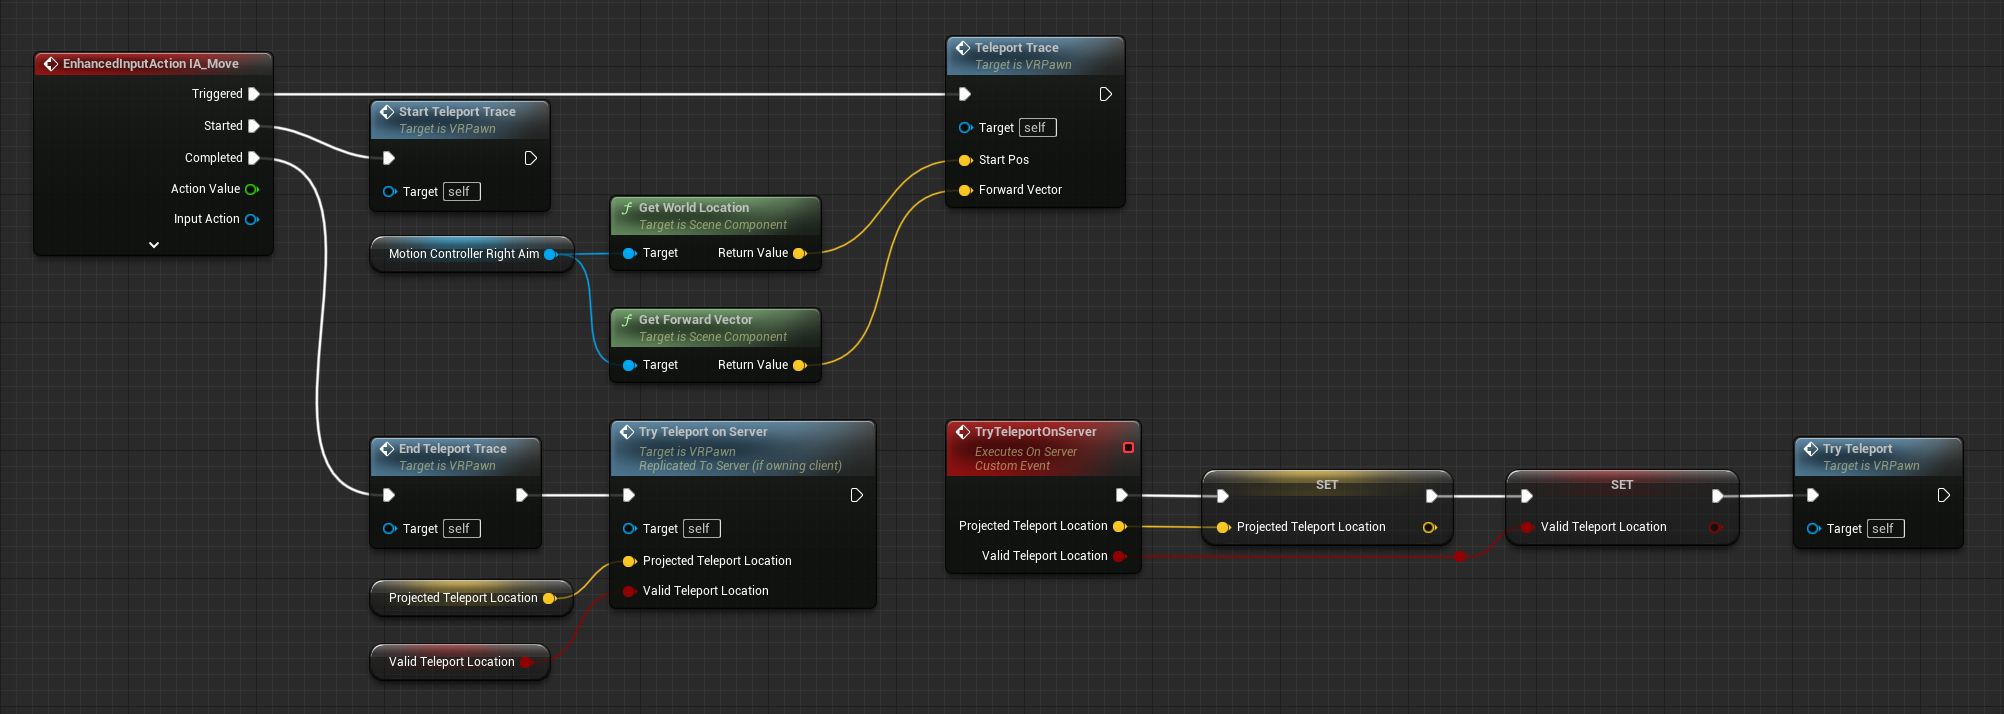
Instead of calling the TryTeleport function on the client side, we will now call the custom event TryTeleportOnServer on the client side. The Blueprint code will now be:
Finally, we need to replicate the VR pawn and its movement. On the left side, select the VRPawn in the components panel. By default, as of writing this, the Replicates and Replicate Movement options are selected in the detail panel of the VRPawn. However, if you try to teleport, you will notice that you are not able to teleport yourself, and the other clients only see your pawn moving around on the floor.
Basically, there are two issues here. First, the client trying to teleport needs to be able to teleport itself. Secondly, we don’t want the pawn to lie on the floor. We are wearing the headset, so there should be an offset. To address the first problem, we need to replicate the VROrigin component. This can be done by selecting the Component Replicates option in the details panel.

At this point, we could even disable the Replicates and Replicate Movement options of the VRPawn and the replication will still work properly. I don’t know why this is happening and would need to delve deeper into the engine and its source code to figure this out. To address the second problem, we need to set the relative location of the camera on the server. The reason why will become clear in the next paragraph when we look into executing the snap turn on the server. For now, just accept this as a fact. The explanation will follow. Our Blueprint code will now look like this:

Finally, we need to replicate the Camera component by selecting the Component Replicates option in the details panel. Otherwise, the relative position will only be set on the server, and the other clients will still see the pawn lying on the ground.
Snap turn
To rotate in increments of 45 degrees, which we will call a snap turn, the player can use the left thumbstick on the controller. The only function here is the Snap Turn function, which needs to be executed on the server. This function also has an input parameter called Right Turn, which is a boolean that decides if the player should turn right or left. For those interested, Marco Ghislanzoni provides a good explanation of snap rotation in VR.
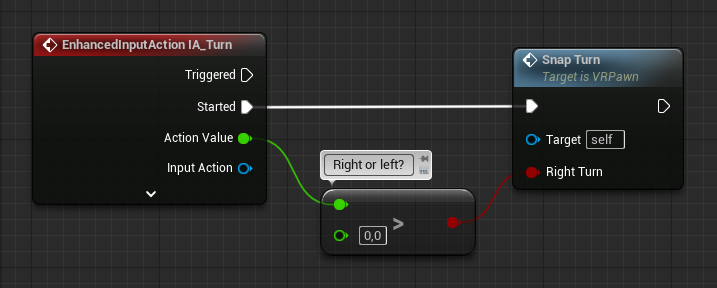
If we look inside the Snap Turn function, we can see a few variables that are used to compute the new actor position (i.e. VRPawn). These variables are:
- Snap Turn Degrees: This defines the amount of rotation in degrees. It has a default value of 45 degrees, which is not changed during gameplay. Since both the client game instance and the server game instance have this value, we don’t need to send it to the server game instance.
- Right Turn: This defines whether the player turns right or left, derived from the left controller thumbstick, which is read on the client side. Therefore, this boolean needs to be sent from the client game instance to the server game instance.
- Camera: This is used for its world location and relative transform, which are used to compute the new VRPawn position. The world location corresponds to the VRPawn world location with an offset represented by the relative transform. We only need to send the relative transform of the Camera to the server. The reason for this will be explained in the next paragraph.
The VRPawn corresponds to the player’s start position, which in turn corresponds to the SteamVR center located on the ground. Initially, the headset position matches the player start position, so the VRPawn and Camera are at the same location since the Camera is attached to the head-mounted display. However, once the headset moves away from the SteamVR center, a relative transform is introduced, representing the offset between the initial and current positions. When the VR headset is rotated, this rotation is reflected in the Camera’s rotation. Consequently, the relative transform needs to be sent from the client game instance to the server game instance because the VR headset’s rotation is read on the client side, not on the server. Since the Camera’s world location is the sum of the VRPawn’s world location and the Camera’s relative transform, only the relative transform needs to be sent to the server. The VRPawn’s world location is already set by the TryTeleport function, which runs on the server.
TL;DR: The boolean Right Turn and the relative transform of the Camera need to be sent to the server to execute the Snap Turn function correctly on the server. The result should look like this:

Location-based virtual reality
At this point, it is possible to teleport and snap turn in a multiplayer environment. But what happens when we start walking and looking around without using our controllers to initiate these actions? Well, this is an interesting question. Remember that we saw earlier that the Camera has a relative offset with respect to the VRPawn and that the Camera is attached to our VR headset? This means that if we start walking around and/or rotating our head, the Camera will follow along. However, this happens only on the client’s game instance. This implies that when a player starts to walk around, the position on this client’s game instance differs from the server’s game instance and the game instances of the other clients connected to the server. In other words, a position mismatch occurs. How do we cope with this, you may ask? Well, let’s introduce the tick event. As stated in the official documentation, this event is used to update Actors each frame. To use the tick event, we need to make sure that the Start with Tick Enabled option is checked in the Class Defaults details panel of the VRPawn.
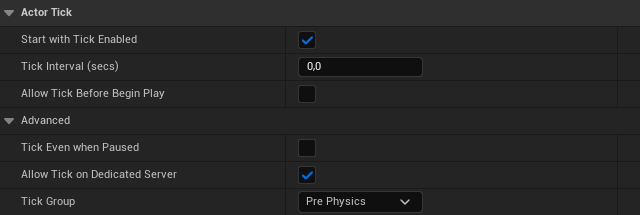
If we send the Camera’s relative transform to the server each frame and let the server update the player’s representation on the other clients, our movement will be synchronized. Does it matter that we only update our Camera and not the VRPawn? No, this doesn’t matter. As mentioned before, when we walk around, the position of the Camera is updated, not the VRPawn position. The relative transform between the Camera and the VRPawn will increase as we move farther away from our start position, but this is not a problem. Implementing this in Blueprint will result in the following:

Just like with the teleport and snap turn, we create a custom event called UpdateCameraOnServer, which we will execute on the server by setting the Replicates option in the details panel of this event to Run on Server. We also define an input parameter of type Transform, which we call Camera Transform. Notice how we check if the event tick is executed on a VRPawn that is locally controlled. We do this because the event tick will also run on the server, and if we don’t include this check, we will see warnings stating: “No owning connection for actor VRPawn_C_XXXXXXXXXX,” since not all actors on the server have an owning connection. Finally, you’ll also see two white overlapping circles in the upper right corner of the Camera variable. This indicates that we have replicated the Camera by checking the Component Replicates option in the details panel. If you have followed the previous paragraphs (i.e., Teleport and Snap Turn), then the Camera component should already be replicated.

The reason for replicating the Camera is to ensure that when we set the camera’s relative transform on the server, the other connected clients are updated as well. In fact, we not only need to replicate the Camera but also the VROrigin because the Camera is a child of the VROrigin. For true LBVR (free-roam), we should disable the teleport and snap turn functionality; otherwise, a mismatch will occur between the relative positions of players in the real world and the virtual world. In LBVR, we want these relative positions to remain consistent. Another important point is that, at the moment, we have only one Player Start in our level, which means all players spawn at the same position. For LBVR, this is ideal because it ensures that players maintain the same relative positions in both the real and virtual worlds. However, for free-roam, this isn’t desirable. In that case, each player joining the game needs a separate Player Start.
Hand movement
When we set up a listen server, connect a few clients, and start walking around, the clients should see each other move. Next, try waving to each other. What do you see? Not a damn thing! Why? Well, you probably guessed it already—we need to replicate our hand movements. This is actually very similar to what we did in the last section. However, this time we will be updating the Motion Controller Left Grip and Motion Controller Right Grip instead of the Camera. Aside from that, it’s essentially a copy-paste of the previous section. The result should look like this:

Well, wasn’t that easy for once :) Next up, hand animations!
Hand animations
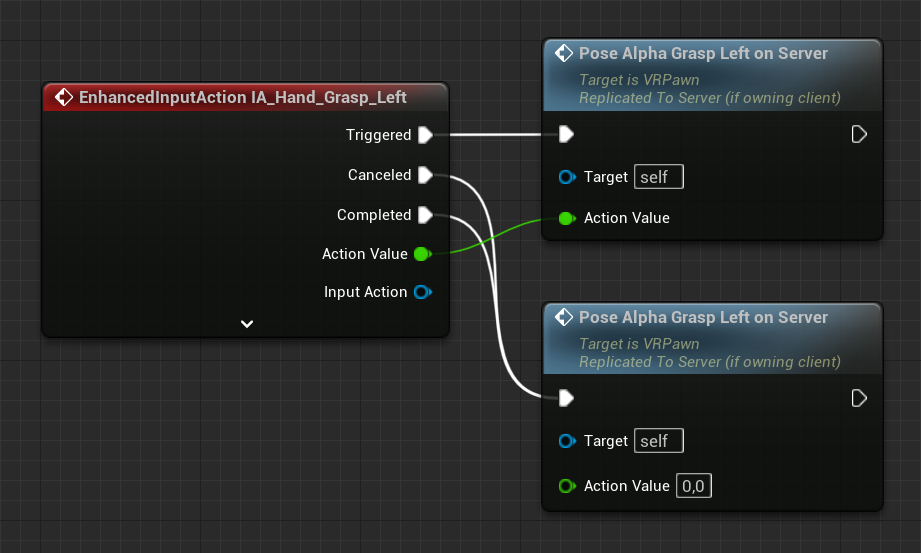
At this point, you’re probably thinking, “Alright, alright, alright, I know what to do.” You open the VRPawn Blueprint, navigate to the hand animations section, and think to yourself, “Let’s do the same as we did for the teleport and snap turn.” You create custom events for each hand animation input, ensure these events are executed on the server, and pass the action values as inputs to these events. The final step is to replicate the pose variables. These variables are declared in the animation instance, which you can find under Content Drawer > Characters > MannequinsXR > Meshes > ABP_MannequinsXR. You click on each variable, check Replicated under Replication in the details panel, and you’re done!
…
You tested it, right? And let me guess—the other clients saw no hand animations whatsoever? I know what you’re thinking: “Well, Mr. Know-It-All, what’s the problem!” Hey, don’t blame me; blame the engine. One thing I didn’t mention is that replication doesn’t work for all features, and, as you probably guessed, Animation Blueprints are one of those things that don’t replicate. I’m not here to judge, but if you did read Unreal Engine’s Network Overview page, you would’ve seen this under the ‘Actor Replication’ section. But I have to be honest—I read it and still forgot when I was trying to figure this out myself. The solution I found and have used is from CodeLikeMe, and it basically consists of the following steps:
-
Create a custom event for each hand animation input, execute these events on the server, and pass the action values as inputs to them.
-
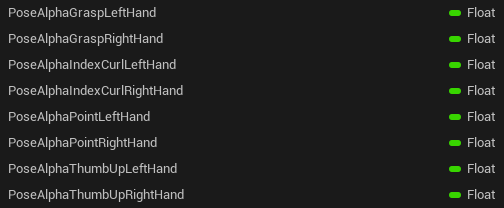
Create a new variable called PoseAlpha... in the VRPawn Blueprint. Essentially, you will be duplicating all variables that are present in the ABP_MannequinsXR.
-
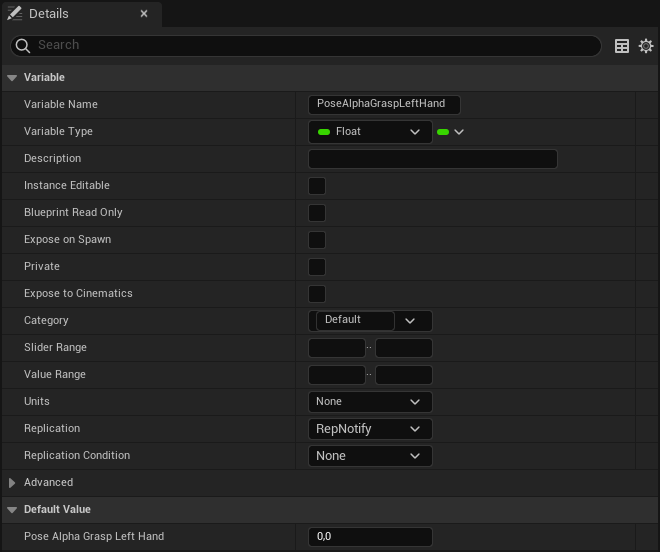
Instead of setting the Replication setting in the details panel to Replicated, we are going to set it to RepNotify.
-
Notice that under the functions list, a new function named OnRep_PoseAlpha... is added. Inside this function, we include the logic that updates the hand animation.

-
Set the new PoseAlpha... variable when the event is called.

-
Repeat this process for the other pose variables. The final result should look like this:
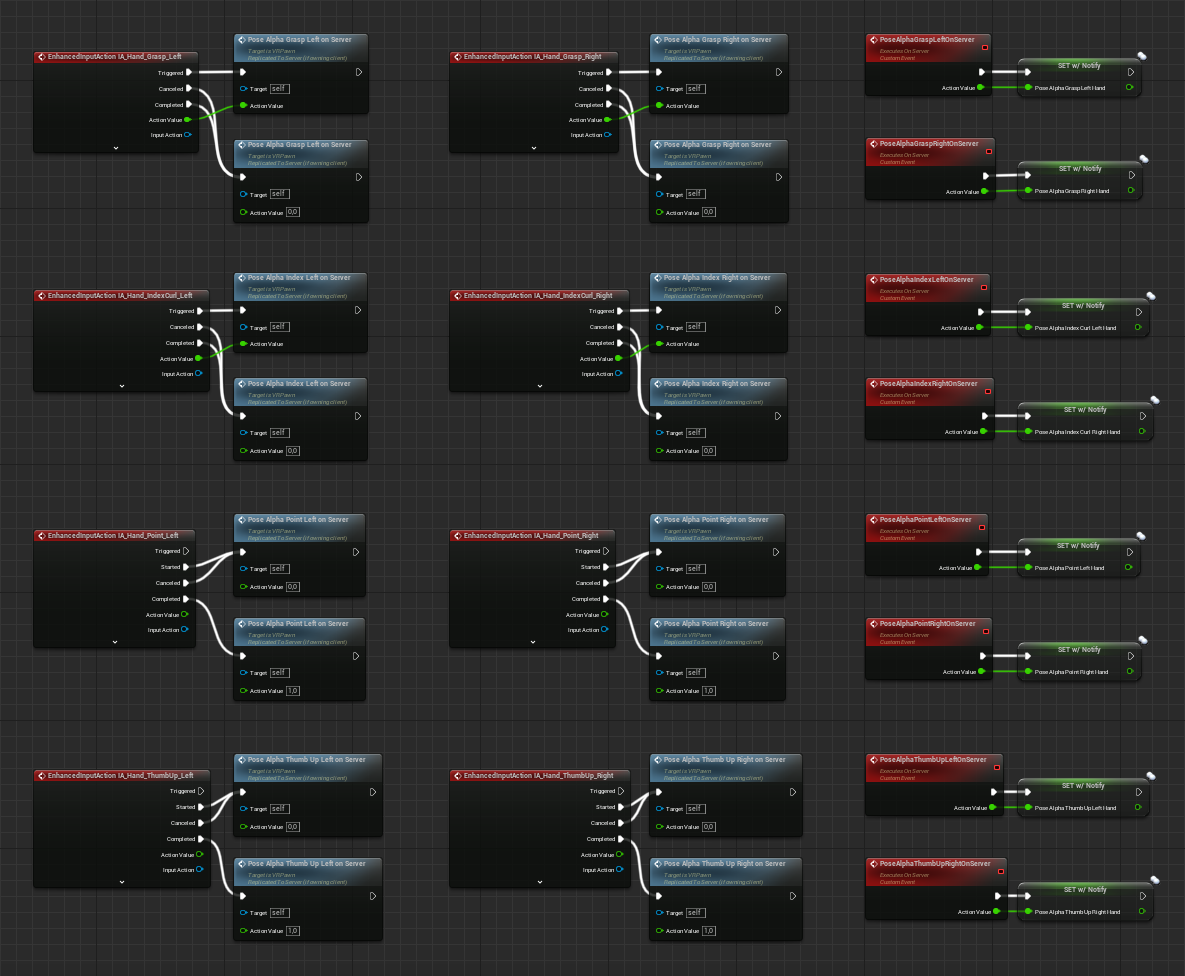
What we’ve done is create a new variable for each pose variable in the VRPawn class. This variable will be set on the server, and because it’s replicated with RepNotify, an OnRep function will be called on all connected clients whenever the variable is updated. As a result, the animation will be visible to all players. This works because the VRPawn is an Actor, and Actors can replicate variables, unlike Animation Blueprints.
Another approach would be to create two custom events for each hand animation. The first event is called and executed on the server, and it immediately triggers a second event, which is a multicast event executed on all clients. This method is explained in detail by Gorka Games. When deciding which method to use, you’ll find sources advocating for RepNotify as the preferred approach, while others argue that the multicast method is superior. I still need to explore this topic further to provide a definitive answer, but for now, I’ll stick with the RepNotify approach.
Grab
The final part of the VRPawn that we need to adjust is the grabbing functionality. To achieve this, we will use the same techniques applied to the teleport and snap turn logic. Specifically, we’ll create a new custom event that will be executed on the server.

When you try to grab one of the cubes or pistols, you’ll notice that their movement isn’t replicated to the other clients. This happens because we need to ensure that these objects themselves are set to replicate. This is separate from executing the grabbing functionality on the server.
Grabbable_SmallCube
Let’s open the Grabbable_SmallCube Blueprint. You can find this Blueprint under Content Drawer > VRTemplate > Blueprints > Grabbable_SmallCube. On the left side, in the Components panel, you’ll see that this Actor consists of three components: Grabbable_SmallCube, StaticMesh, and GrabComponent. To ensure that this object is replicated properly, we need to set the StaticMesh component to replicate.

Next, we need to replicate the actor itself.
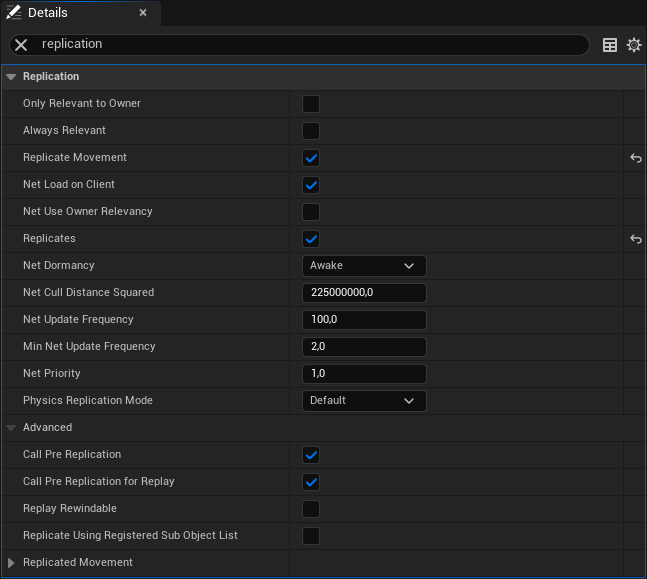
If we now grab this type of cube and interact with the world around us, these movements and interactions will be replicated to the other clients. Next, let’s look at the pistol.
Pistol
Replicating the pistol interactions is more complex than replicating the cube interactions. This is because we need to not only replicate its movement but also handle remapping the controllers on the client side, spawning the projectiles on the server, and replicating them to all other clients. First things first, let’s start with replicating the pistol movement. This is similar to what we did for the cube.
Open the Content Drawer and navigate to VRTemplate > Blueprints > Pistol. In the Components window on the left side, you’ll see the hierarchy of this actor. The top level is the Pistol. One level below, you’ll find the SkeletalMeshGun. On the third and final level are the GrabComponentSnap and MuzzleLocation. The latter two do not need to be replicated, but the SkeletalMeshGun does. So let’s start there.

Next, we need to replicate the actor itself.
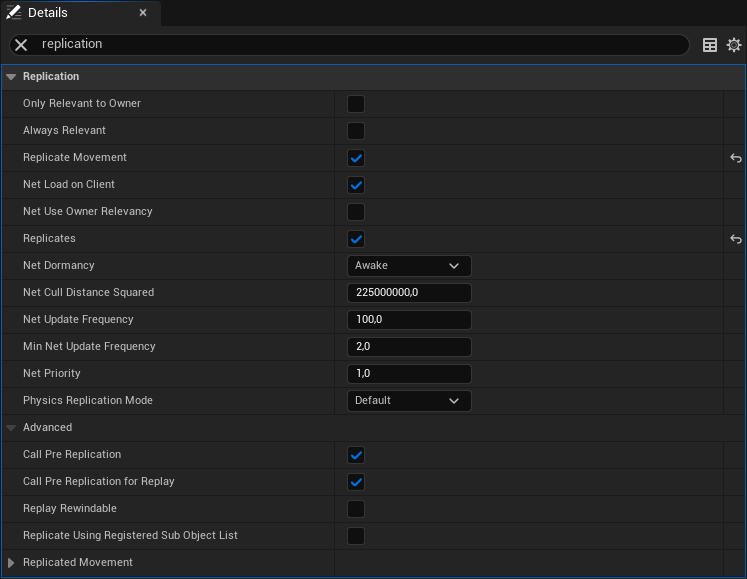
So far, this process is very similar to what we did with the cube. At this point, we can grab the pistol, and its movement will be replicated to the other clients. However, if we try to fire the gun, nothing happens. We can even observe that the finger used to pull the trigger doesn’t bend. This indicates that the client is still using the default input mapping context instead of the weapon input mapping context. Since the grab action is performed on the server, the mapping context is changed on the server, but it needs to be updated on the client that initiated the grab action.
To address this, we create a new custom event in the Pistol’s Event Graph. This time, we set the Replicates setting to Run on Owning Client and check the Reliable checkbox to ensure that this event will always be called. We don’t want a player to grab a gun and not be able to use it properly.
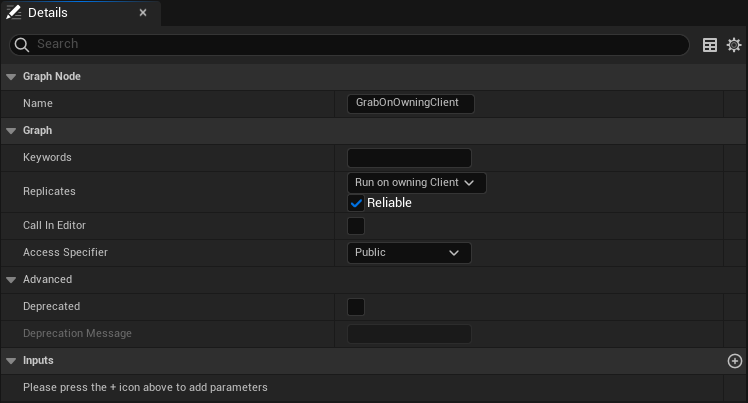
This event will be triggered when the GrabComponent’s On Grabbed event is called.

When we try to grab the pistol and shoot again, we will notice that it still doesn’t work. Why is that? Well, the GrabOnOwningClient event is being executed on the server because we didn’t set the client initiating the grab as the owner of the pistol on the server. To fix this, we create a new input for the TryGrab function of the GrabComponent. This input will be of type Actor and will be called Actor.

Now, we use this input to pass a reference to the VRPawn that is trying to grab the weapon. This will be done in the VRPawn Blueprint.
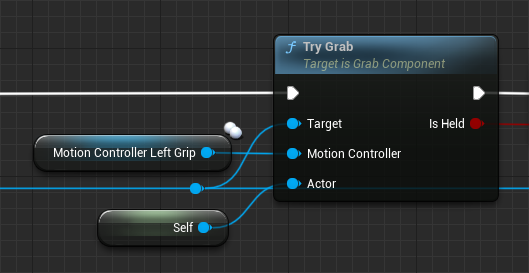
Inside the TryGrab function, we will then set this actor as the owner of the object that is being grabbed.

The function HeldByHand from the GrabComponent will be called on the owning client’s side. To ensure that the MotionControllerRef, which is set on the server, has the appropriate value, we need to replicate the GrabComponentSnap from the Pistol. Additionally, we need to set the MotionControllerRef variable of the GrabComponent to Replicated and the Replication Condition to Owner Only.

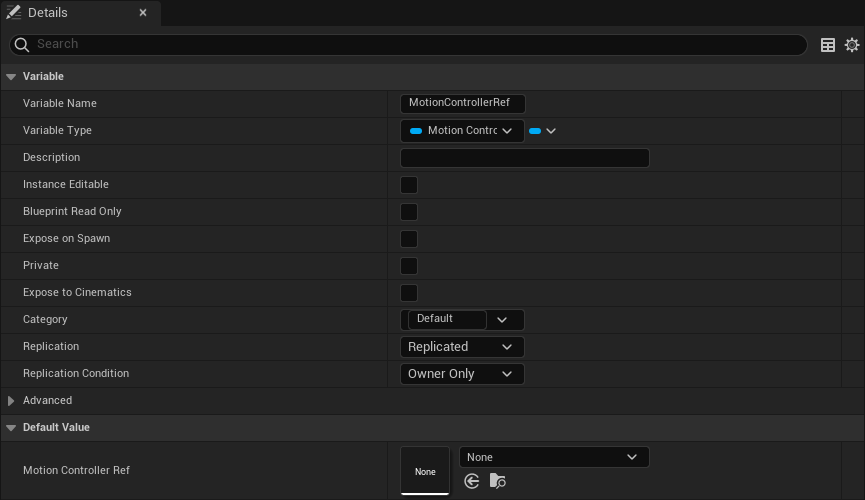
When using this approach, race conditions between the Replicated variable MotionControllerRef and the GrabOnOwningClient RPC are possible, which could lead to warnings stating, “Warning: Accessed None trying to read property MotionControllerRef” on the client side. To solve this, we could introduce a new variable in the Pistol Blueprint called HeldByHand, which holds the value returned by the GetHeldByHand function of the GrabComponent Blueprint. The function GetHeldByHand will be called just before the GrabOnOwningClient RPC is executed, and the returned value will be used as an input argument for this RPC. On the client side, this variable is then set and used to determine the input mapping context. If we do this, we won’t need to replicate the GrabComponentSnap and the MotionControllerRef variable.

At this point, we are able to grab the pistol and remap the input mapping context on the owning client. Finally, to be able to fire the weapon, we need to spawn the projectile on the server and replicate it. To spawn the projectile on the server, we use a custom event that will run on the server.
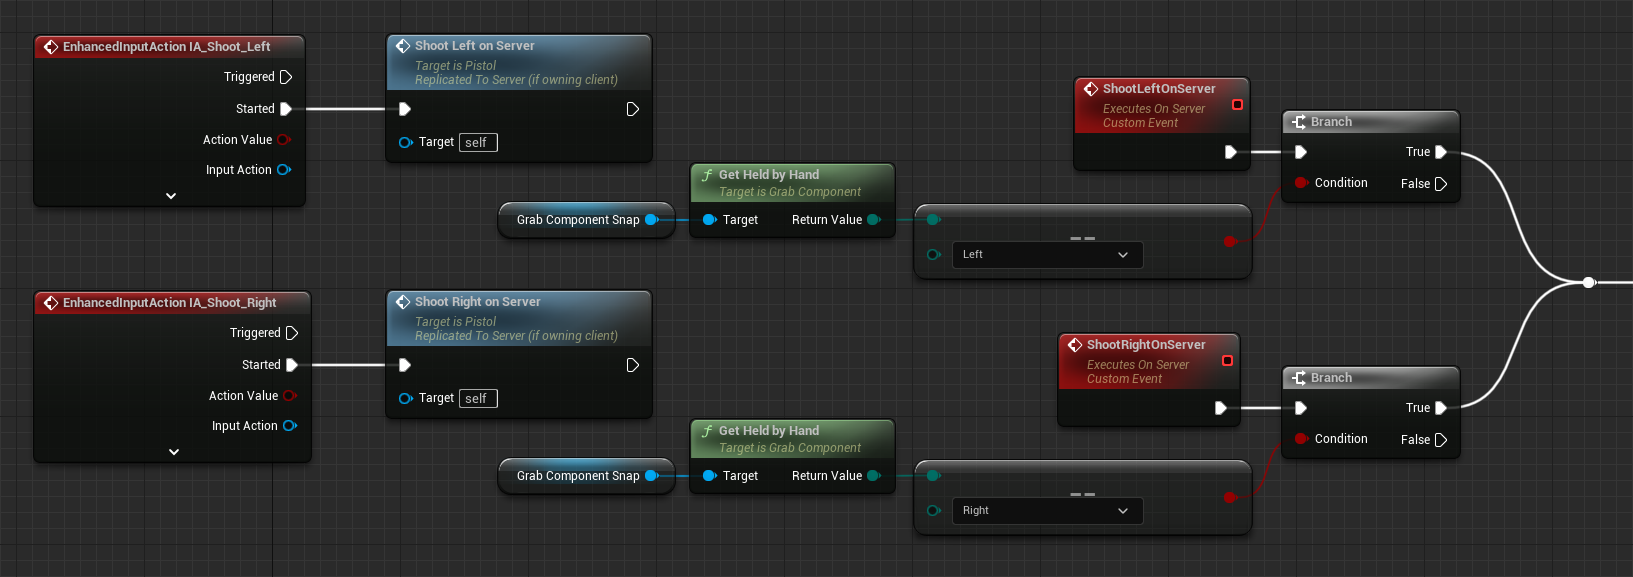
The projectile itself also needs to be replicated.
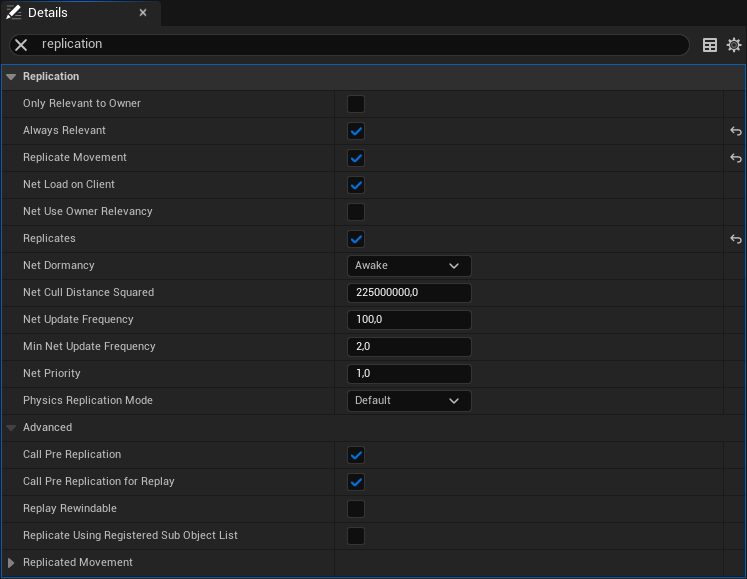
Once the player drops the weapon, we want to remove the client that held the weapon as the owner of the actor. This will be handled in the TryRelease function of the GrabComponent.
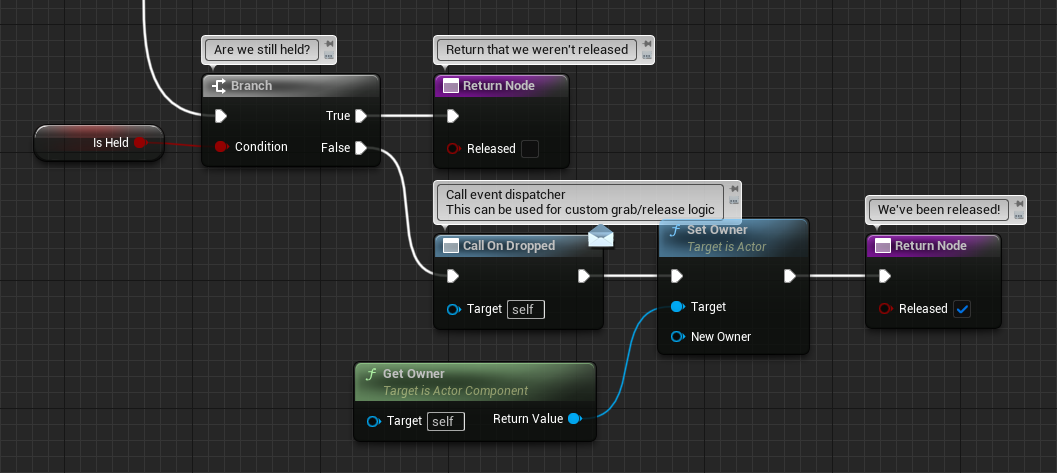
At this point, you will be able to fire the weapon and see the projectile fly and interact with the environment. However, there is one last thing that needs to be addressed. When grabbing a pistol or a cube, a haptic effect is played, and the same applies when firing the pistol. Currently, these haptic effects are being executed on the server side, meaning the player performing the action won’t feel them unless they are the listen server.
Let’s first address the haptic effect when grabbing a cube or pistol. Go to the GrabComponent Blueprint and open the event graph. Create a new custom event that executes the haptic effect on the owning client.

This event will then be triggered when an object is grabbed in the TryGrab function.

Finally, we need to ensure that the haptic effect PistolFireHapticEffect is executed on the owning client when the pistol is fired.
