How to deploy a mobile VR application to the Vive Focus 3
- 21 Nov 2024Setup
- CPU: Intel Core i5-13600KF
- GPU: Inno3D GeForce RTX 4070 TWIN X2
- RAM: 64 GB
- OS: Windows 10 Pro 22H2
- UE: 5.4
- HMD: Vive Focus 3
Summary
This tutorial explains how to deploy a mobile VR application to the Vive Focus 3. We will use the VRTemplate as the application to be deployed. By the end of the tutorial, you will be able to run the VRTemplate as a mobile application on the Vive Focus 3. If you have any questions, feel free to email us.
Set Up Android SDK and NDK
The Vive Focus 3 is an Android-based standalone headset, so the Unreal Engine will need to be configured for Android development. I started with UE 5.4 but when trying to install the Vive Wave SDK I discovered that there was no support for UE 5.4. The latest supported version is UE 5.3. Despite using UE 5.4 for the Android SDK and NDK setup I had no issues switching to UE 5.3 when installing the Vive Wave SDK. The advantage of using UE 5.4 or newer is that the Android Turnkey installation can be used which simplifies the installation process. To set up the Android SDK and NDK in UE 5.4 follow the next steps:
- Open the Epic Games Launcher and go to Unreal Engine > Library.
- Click on the arrow next to the Launch button, select Options > Target Platforms > Android and click Apply.
- Install Android Studio and the necessary SDK components. Follow Unreal Engine’s documentation for this.
Install the Vive Wave SDK
The Vive Wave SDK provides the tools necessary to develop for the Vive Focus 3. The following steps explain how to install the SDK:
- Download the Vive Wave SDK (latest version) from the Vive Developer website. At the time this was UE 5.3. Despite UE 5.4 was already released.
- Extract the Vive Wave SDK and copy the Plugins directory’s content (i.e. WaveVR) to your Unreal Engine project’s Plugins folder.
- Go to Edit > Plugins inside the Unreal Editor and search for Wave VR. If the plugin doesn’t show up then restart the Unreal Editor and try again.
-
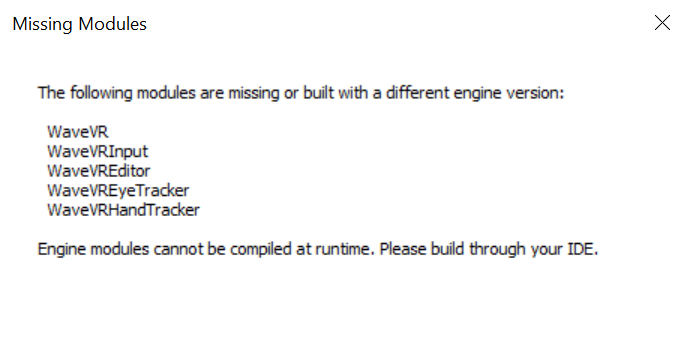
Enable the Wave VR plugin and restart the Unreal Engine as prompted. If you get the following pop-up window then click No.

Right-click on the .uproject and select Switch Unreal Engine version…. change your Unreal Engine version from 5.4 to 5.3.

Finally, change your Unreal Engine version from 5.4 to 5.3 from the drop-down menu.

Configure the project settings
Set the Project Settings according to Vive’s documentation. The only difference with the Vive documentation is that on step 4 we first had to disable Package for Meta Quest devics and then enable Support OpenGL ES3.2 otherwise this option cannot be changed. In the Vive documentation Support OpenGL ES3.1 is mentioned but for us it was Support OpenGL ES3.2.
Vive Wave SDK compliant
To run the VRTemplate as an Android application on the Vive Focus 3 we need to make some changes to our Unreal project.
Enhanced Input
If you’re using Enhanced Input, ensure WaveVR inputs are mapped accordingly in your Input Mapping Contexts. You can find them in your Content Browser > All > Content > VRTemplate > Input.
- IMC_Default
- IA_Move: Wave (R) Thumbstick Y
- IA_Turn: Wave (L) Thumbstick X
- IA_Grab_Left: Wave (L) Grip Press
- IA_Grab_Right: Wave (R) Grip Press
- IA_Menu_Toggle_Left: Wave (L) Y Press
- IA_Menu_Toggle_Right: Wave (R) B Press
- IMC_Hands
- IA_Hand_Point_Left: Wave (L) Trigger Touch
- IA_Hand_Point_Right: Wave (R) Trigger Touch
- IA_Hand_ThumbUp_Left: Wave (L) Thumbstick Touch
- IA_Hand_ThumbUp_Right: Wave (R) Thumbstick Touch
- IA_Hand_Grasp_Left: Wave (L) Grip Axis
- IA_Hand_Grasp_Right: Wave (R) Grip Axis
- IA_Hand_IndexCurl_Left: Wave (L) Trigger Axis
- IA_Hand_IndexCurl_Right: Wave (R) Trigger Axis
- IMC_Menu
- IA_Menu_Interact_Left: Wave (L) Trigger Axis
- IA_Menu_Interact_Right: Wave (R) Trigger Axis
- IMC_Weapon_Left
- IA_Shoot_Left: Wave (L) Trigger Press
- IMC_Weapon_Right
- IA_Shoot_Right: Wave (R) Trigger Press
VRPawn
- Change the Motion Source of the MotionControllerLeftGrip/MotionControllerRightGrip to Left/Right.
- Rename the MotionControllerLeftAim/MotionControllerRightAim to MotionControllerLeftAimOld/MotionControllerRightAimOld.
- Add a Wave VRController Pointer as the child of the MotionControllerLeftGrip/MotionControllerRightGrip and name it MotionControllerLeftAim/MotionControllerRightAim.
- Set the WidgetInteractionLeft/WidgetInteractionRight as a child of the MotionControllerLeftAim/MotionControllerRightAim.
- Go to the Event Graph, Input Action Move - Teleport and replace the Motion Controller Right Aim Old getter with the Motion Controller Right Aim getter.
- Delete the MotionControllerLeftAimOld/MotionControllerRightAimOld.
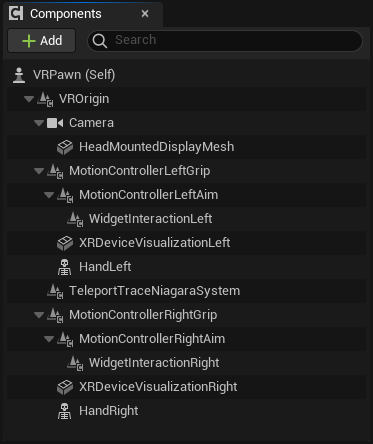
At this point the Components hierarchy should look like the following:

- Set the Spot scale of the MotionControllerLeftAim/MotionControllerRightAim to (X=0.000000,Y=0.000000,Z=0.000000) to hide the pointer.
- Set the Fading particle size of the MotionControllerLeftAim/MotionControllerRightAim to (X=0.000000,Y=0.000000,Z=0.000000) to hide the beam.
- Change the location and rotation of the HandLeft/HandRight
- HandLeft
- Location = (X=-14.000000,Y=-3.500000,Z=-1.000000)
- Rotation = (Pitch=-90.000000,Yaw=-180.000000,Roll=90.000000)
- HandRight
- Location = (X=-14.000000,Y=3.500000,Z=-1.000000)
- Rotation = (Pitch=90.000000,Yaw=0.000000,Roll=90.000000)
- HandLeft
GrabComponent
- Go to the GetHeldByHand function and change LeftGrip to Left.
- Go to the TryGrab function and replace PlayHapticEffect with TriggerHapticPulse.

Pistol
- Change the location and rotation of the GrabComponentSnap.
- Location = (X=0.000000,Y=12.000000,Z=5.000000)
- Rotation = (Pitch=10.000000,Yaw=90.000000,Roll=0.000000)
- Go to the event graph and replace PlayHapticEffect with TriggerHapticPulse.

Menu
- In the SetMotionControllerReference function replace LeftAim/RightAim in the Select node with Left/Right.
Testing and Deployment
Package the Project
- In the Unreal Editor, go to Platforms > Android > Package Project and under Flavor selection choose Android (ASTC).
Deploy to the Vive Focus 3
- Set the headset in Developer Mode.
- In Developer Mode on the headset, enable USB Debugging in Settings > Advanced > USB debugging.
- Connect your Vive Focus 3 to your PC using a USB-C cable.
- Use the Android Debug Bridge (ADB), found in Android SDK’s platform-tools folder, to install the APK:
adb install path/to/yourproject.apk
- Launch the app from the headset’s app library once installed.
Time to explain a few things
You will notice that in the orignal VRTemplate it was possible to use the thumbstick to move over the Menu. This is not possible with the Wave SDK because there is no WaveVR input that combines both the X- and Y-value. If you look at the IMC_Menu you will see under IA_Menu_Cursor_Left [Vendor] (L) Thumbstick 2D-Axis. This option is not available for the WaveVR input.
In the VRPawn we have changed the Motion Source from LeftGrip/RightGrip to Left/Right. However, if you hover over Motion Source you will see the following description: Defines which pose this component should receive from the OpenXR Runtime. Left/Right MotionSource is the same as LeftGrip/RightGrip. See OpenXR specification for details on poses. It is important to emphasize that this is the case for OpenXR since we no longer use this plugin there is no option available called LeftGrip/RightGrip. You will see this if you click on the drop-down list. If we don’t change the Motion Source then both hands will lay on the ground and don’t move at all.
We have also made the WaveVRControllerPointer, called MotionControllerLeftAim/MotionControllerRightAim, a child of the MotionControllerLeftGrip/MotionControllerRightGrip. This is done to make sure that the WaveVRControllerPointer is tracked since it has no Motion Source. In the original VRTemplate this is not necessary because there the MotionControllerLeftAim/MotionControllerRightAim uses the LeftAim/RightAim Motion Source. Since, these are part of OpenXR we can no longer use them.